开发与调试
开发
用户在开发前需要先下载开发套件,其中提供了一些开发工具和模板,用户可以基于这些模板开发推理功能单元和数据处理功能单元。
用户在开发时需要先熟悉ModelBox提供的一些能力,如其中的视频编解码,图片的Resize,Normlize。ColorTranspose,Yolo这些功能单元都已经在ModelBox中提供。用户可以通过API调用或者是直接构图来开发应用,如图1中蓝色功能单元是ModelBox通用框架中已经提供的,浅蓝色的功能单元则是需要用户自己实现的。PlateInfer是一个推理功能单元,DrawBox有两个输入,一个是图片,另一个是一组框,输出是绘制完框的图。
用户使用开发工具在本地生成推理功能单元模板和通用开发功能单元模板,按上文中的plate.pb模型的内部属性,完成模型配置文件,接着使用打包工具打包成推理功能单元。用户需要使用多个不同的模型跨平台时,用户可以针对不同的模型完成多个推理功能单元的配置,同时使用同一个名字即可以实现跨平台的推理功能单元。接着按照功能单元开发规范,完成DrawBox的功能单元开发,对于已有代码的用户,可以认为是将
for(bbox_reuslt in bbox_reuslts)
draw_pic = draw_bbox(draw_pic,bbox_reuslt)
这一段代码按功能单元规范改写成功能单元,接着使用打包工具将DrawBox功能单元打包。
在两个功能单元开发完成后,用户可以使用工具扫描功能单元所在的路径确定功能单元配置和打包是否成功。打包成功后,扫描会显示存在这两个功能单元。
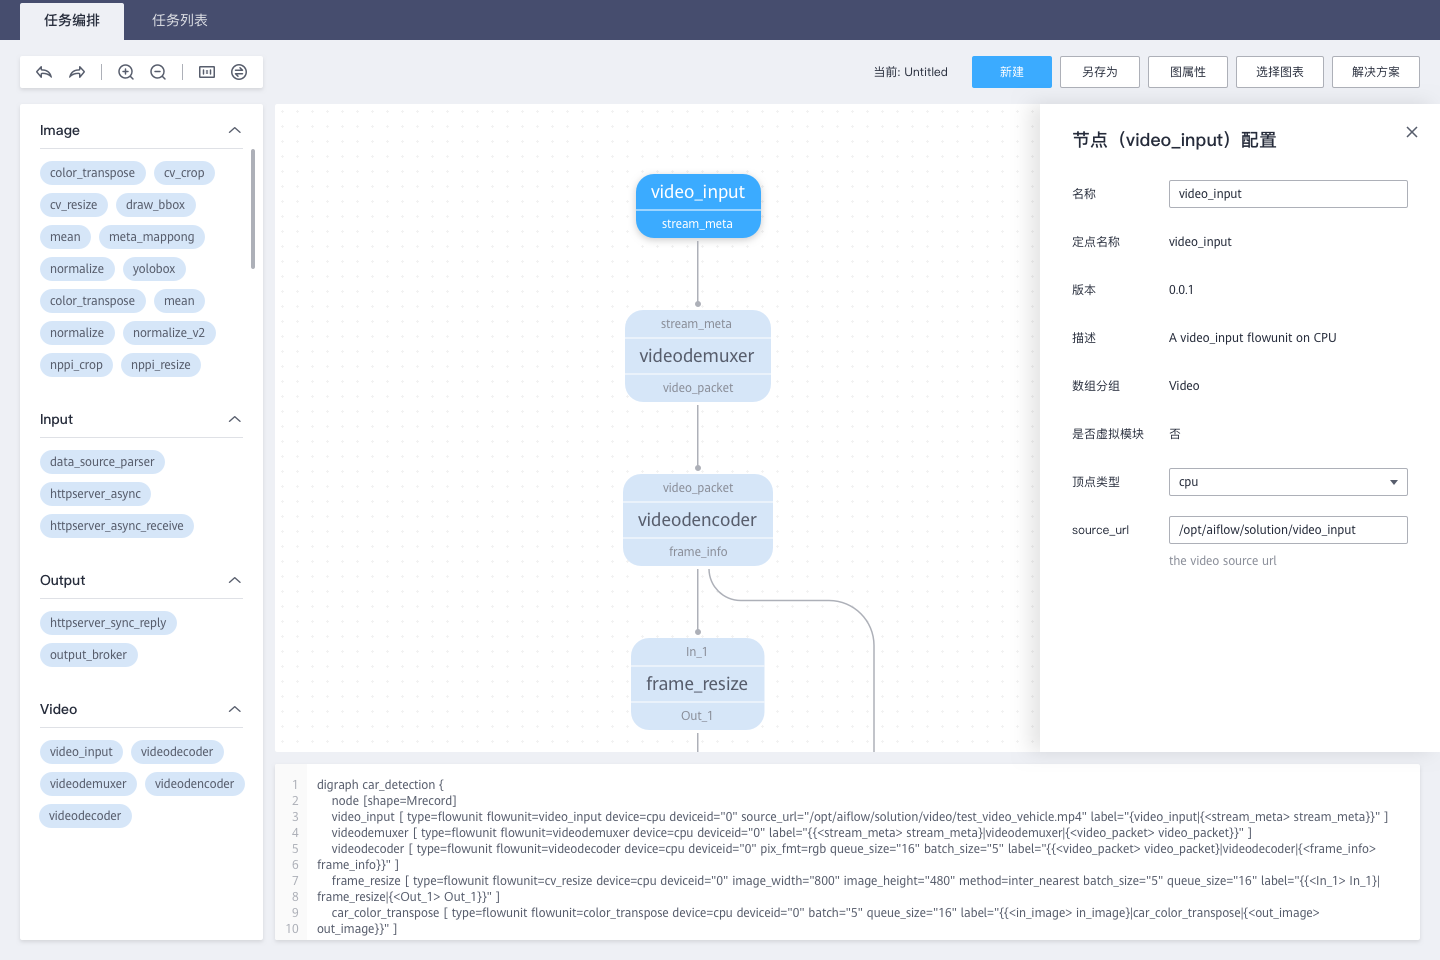
接着就可以打开图开发的UI工具,进行图的开发,图的编排工具如图1所示。
在指定扫描路径后,在上图中左侧的功能单元控件中就可以看到PlateInfer和DrawBox两个。接着用户就可以在UI上通过拖拽将上述的图构建出来,如图2所示。
在下面的editor中可以获取图的拼接配置如下所示。
digraph car_detection {
node [shape=Mrecord]
video_input[type=flowunit, flowunit=video_input, device=cpu, deviceid=0, source_url="@SOLUTION_VIDEO_DIR@/test_video_vehicle.mp4"]
videodemuxer[type=flowunit, flowunit=videodemuxer, device=default, deviceid=0]
videodecoder[type=flowunit, flowunit=videodecoder, device= default, deviceid=0, pix_fmt=rgb, queue_size = 16, batch_size=5]
frame_resize[type=flowunit, flowunit=cv_resize, device=default, deviceid=0, image_width=800, image_height=480, method="inter_nearest", batch_size=5, queue_size = 16]
car_color_transpose[type=flowunit, flowunit=color_transpose, device=default, deviceid=0, batch = 5, queue_size = 16]
car_normalize[type=flowunit, flowunit=normalize, device=default, deviceid=0, normalize="0.003921568627451, 0.003921568627451, 0.003921568627451", queue_size = 16, batch_size = 5]
plate_infer[type=flowunit, flowunit=plate_infer, device= default, deviceid=0, queue_size = 16, batch_size = 5]
yolobox[type=flowunit, flowunit=yolobox, device=cpu, deviceid=0, image_width=1920, image_height=1080, queue_size = 16, batch_size = 5]
draw_bbox[type=flowunit, flowunit=draw_bbox, device=cpu, deviceid=0, queue_size = 16, batch_size = 5]

videoencoder[type=flowunit, flowunit=videoencoder, device= default, deviceid=0, queue_size=16, default_dest_url="rtsp://localhost/test", encoder="mpeg4"]
video_input:stream_meta -> videodemuxer:stream_meta
videodemuxer:video_packet -> videodecoder:video_packet
videodecoder:frame_info -> frame_resize:In_1
frame_resize: Out_1 -> car_color_transpose: in_image
car_color_transpose: out_image -> car_normalize: input
car_normalize: output -> plate_infer:data
plate_infer: "layer15-conv" -> yolobox: "layer15-conv"
plate_infer: "layer22-conv" -> yolobox: "layer22-conv"
yolobox: Out_1 -> draw_bbox: In_1
videodecoder:frame_info -> draw_bbox: In_2
draw_bbox: Out_1 -> videoencoder: frame_info
}
在该图中,可以指定每个功能单元的设备,可以指定为具体的CPU、GPU设备,也可以设为default,则ModelBox会根据环境选择最合适的功能单元。当完成上图的配置后,用户即可以通过run接口将整个图运行起来。
调试
用户在图运行的过程中,可以通过对功能单元进行断点或者是日志输出的方法对功能单元进行调试。在图的文件中,用户可以通过下面的配置打开性能功能。
[profile]
profile="enable" # 启用profile
trace="enable" # 启用tracing
在性能分析图中,左侧是图中的各个功能单元的名称,右侧是运行时间轴,蓝条表示的是功能单元运行的时间。如果某个功能单元的蓝条基本填满了时间轴,则说明该功能单元是图的瓶颈。用户可以据此判断业务是否达到能力上限,或者是否可以改造业该功能单元,以提高业务上限。

