表情识别
表情识别案例是对输入视频进行解码,然后对每一帧图片进行人脸检测,如果检测到人脸,则识别人脸表情,最后将结果渲染成视频。
功能
输入本地视频文件,识别画面中的人脸表情,并将识别结果保存到本地。
模型准备
AI应用开发前需要准备好匹配当前ModelBox版本支持的推理框架和版本的模型文件,这里已经准备好人脸检测,表情识别两个torch模型文件。
AI应用开发
首先准备开发环境,备好了之后进入应用开发环节,主要分为流程图编排、功能单元编写、运行与调试、打包部署4个开发步骤。
环境准备
环境准备工作可以参考环境准备,区别是需要选择torch镜像:
docker pull modelbox/modelbox-develop-libtorch_1.9.1-cuda_10.2-ubuntu-x86_64:latest
创建项目
可参考创建项目,最后可选择创建emotion_detection项目工程。
本案例是测试本地视频文件,可以测试视频路径可以在video_input节点中设置,结果视频路径在videoencoder节点中设置。
流程图开发
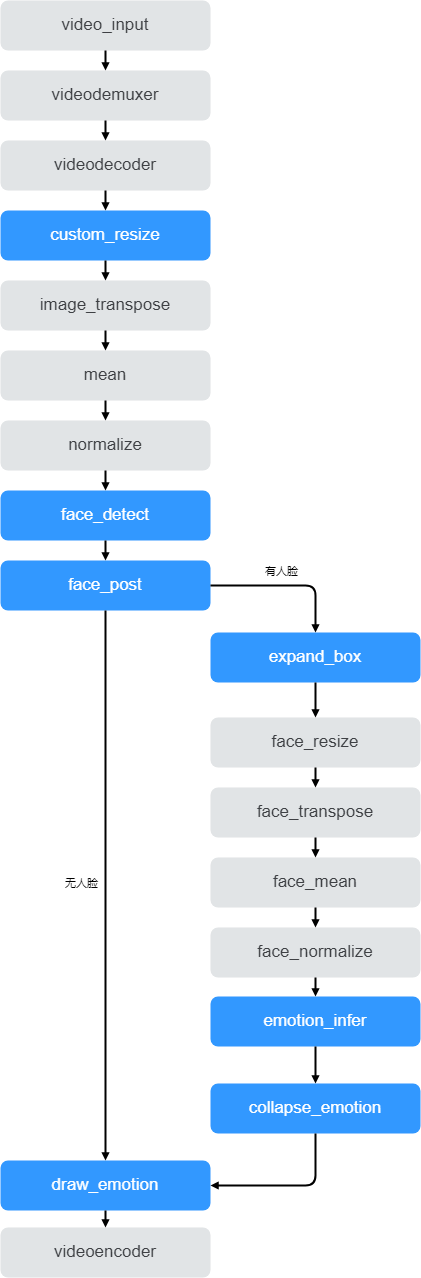
如上图所示,整个流程图分为4个阶段:视频读取/解码、人脸检测、表情识别、结果渲染;
视频读取/解码:video_input功能单元用作输入视频配置,后面接视频的解封装、解码功能单元(videodemuxer、videodecoder)得到视频帧。后续需要进行两次模型推理(人脸检测、表情识别);
人脸检测:检测视频帧中有没有人脸,进行预处理(custom_reisze、transpose、normalize)、人脸检测模型推理(face_detect)、后处理(face_post)。根据后处理的结果判断是否有人脸,若有人脸则进入表情识别分支,若无人脸则走无人脸分支;
表情识别:一张图可能有多张人脸,需要对每张人脸进行表情识别,这就需要把一个帧图像展开成一个个人脸图片(expand_box),然后做表情识别预处理(face_resize、face_transpose、face_mean、facenormalize)、推理(emotion_infer)、后处理。然后收集前面展开的每一个人脸推理结果汇聚成一个视频帧的推理结果,这里把后处理与合并两个操作融合成一个功能单元(collapse_emotion)。
结果渲染:人脸图画出检测框渲染到图像上(draw_emotion),最后将渲染结果图编码成视频文件(videoencoder)。
整个流程只需要实现蓝色部分功能单元,其他功能单元都在ModelBox中内置,只需修改配置即可使用。具体toml配置文件如下所示:
[graph]
format = "graphviz"
graphconf = """digraph emotion_detection {
    node [shape=Mrecord]
    video_input[type=flowunit, flowunit=video_input, device=cpu, source_url="/opt/modelbox/demo/video/emotion_test_video.mp4"]
    videodemuxer[type=flowunit, flowunit=video_demuxer, device=cpu]
    videodecoder[type=flowunit, flowunit=video_decoder, device=cuda, pix_fmt=bgr]
    custom_resize[type=flowunit, flowunit=custom_resize, device=cpu]
    image_transpose[type=flowunit, flowunit=packed_planar_transpose, device=cpu]
    mean[type=flowunit, flowunit=mean, device=cpu, mean="104, 117, 123"]
    normalize[type=flowunit, flowunit=normalize, device=cpu, standard_deviation_inverse="1, 1, 1"]
    face_detect[type=flowunit, flowunit=face_detect, device=cuda]
    face_post[type=flowunit, flowunit=face_post, device=cpu, batch_size=1]
    expand_box[type=flowunit, flowunit=expand_box, device=cpu]
    face_resize[type=flowunit, flowunit=resize, device=cpu, image_width=224, image_height=224]
    face_transpose[type=flowunit, flowunit=packed_planar_transpose, device=cpu]
    face_mean[type=flowunit, flowunit=mean, device=cpu, mean="123.675, 116.28, 103.53"]
    face_normalize[type=flowunit, flowunit=normalize, device=cpu, standard_deviation_inverse="0.0171247538316637, 0.0175070028011204, 0.0174291938997821"]
    emotion_infer[type=flowunit, flowunit=emotion_infer, device=cuda, batch_size=1]
    collapse_emotion[type=flowunit, flowunit=collapse_emotion, device=cpu]
    draw_emotion[type=flowunit, flowunit=draw_emotion, device=cpu]
    videoencoder[type=flowunit, flowunit=video_encoder, device=cpu, encoder=mpeg4, format=mp4, default_dest_url="/tmp/emotion_detection_result.mp4"]

    video_input:out_video_url -> videodemuxer:in_video_url
    videodemuxer:out_video_packet -> videodecoder:in_video_packet
    videodecoder:out_video_frame -> custom_resize:in_image
    custom_resize:out_image -> image_transpose:in_image
    image_transpose:out_image -> mean:in_data
    mean:out_data -> normalize:in_data
    normalize:out_data -> face_detect:input
    face_detect:out_loc -> face_post:in_loc
    face_detect:out_conf -> face_post:in_conf
    face_detect:out_cls -> face_post:in_cls
    videodecoder:out_video_frame -> face_post:in_image
    face_post:has_face -> expand_box:in_data
    expand_box:roi_image -> face_resize:in_image
    face_resize:out_image -> face_transpose:in_image
    face_transpose:out_image -> face_mean:in_data
    face_mean:out_data -> face_normalize:in_data
    face_normalize:out_data -> emotion_infer:input
    emotion_infer:confidence -> collapse_emotion:confidence
    emotion_infer:predicts -> collapse_emotion:predicts
    collapse_emotion:out_data -> draw_emotion:in_emotion
    face_post:has_face -> draw_emotion:in_face
    draw_emotion:out_data -> videoencoder:in_video_frame
    face_post:no_face -> videoencoder:in_video_frame
}"""
功能单元开发
需要开发的功能单元可参考[project_root]/src/flowunit/目录,这里主要讲解之前案例没有用到的条件功能单元、展开/合并功能单元如何使用:
人脸后处理功能单元(face_post)
这是一个条件功能单元,根据人脸检测模型推理结果判断当前视频帧是否包含人脸。具体toml配置如下:
[base]
name = "face_post"
device = "cpu"
version = "1.0.0"
description = "face detection postprocess"
entry = "face_post@FacePost"
type = "python"

condition = true  # 表示该功能单元为条件功能单元

[config]
max_edge = 320

[input]
[input.input1]
name = "in_loc"

[input.input2]
name = "in_conf"

[input.input3]
name = "in_cls"

[input.input4]
name = "in_image"

# 条件功能单元的多个输出端口仅能选择一个输出
[output]
[output.output1]
name = "has_face"

[output.output2]
name = "no_face"
详细配置和功能单元代码可参考:
[project_root]/src/flowunit/face_post展开/合并功能单元
展开/合并功能单元一般成对使用。
展开功能单元,在本案例中是将一个视频帧展开成一个个人脸图,具体toml配置如下:
[base]
name = "expand_box"
device = "cpu"
version = "1.0.0"
description = "expand each box to emotion detection"
entry = "expand_box@ExpandBox"
type = "python"

expand = true  # 表示该功能单元为展开功能单元

[input]
[input.input1]
name = "in_data"

[output]
[output.output1]
name = "roi_image"
合并功能单元,在本案例中是将前面一帧图像展开的人脸图推理结果合并,具体toml配置如下:
[base]
name = "collapse_emotion"
device = "cpu"
version = "1.0.0"
description = "collapse all face emotion"
entry = "collapse_emotion@CollapseEmotion"
type = "python"

collapse = true      # 表示该功能单元为合并功能单元

[input]
[input.input1]
name = "confidence"

[input.input2]
name = "predicts"

[output]
[output.output1]
name = "out_data"
详细配置和功能单元代码可参考:
[project_root]/src/flowunit/collapse_emotion